In the last article in this series, we looked at a few of the features that version control (specifically Subversion) offers to a writer, coder, or editor. These benefits include the ability to track all of the changes made to a file in a project, synchronize your work between different computers, and automatically ensure that everything is backed up. But though these are invaluable contributions to a writer’s workflow, they only scratch the surface of what Subversion is capable of doing.
In the next few posts, I would like to dive a bit deeper and take a look at a few of Subversion’s more advanced features, such as:
- How to compare newer changes to older versions of a file
- How to use Subversion’s collaboration features to work with others
- How you can resolve errors that might arise from incompatible changes made to the same file
Though Subversion’s basic features are tremendously powerful, it’s the advanced options that make it indispensible. You know, the little things that live in the background most of the time, except when you really need them. This rest of this series is about how to leverage those. The first of those features we will look at is the revision history.
Living With History
In the first post in this series, I spent quite a bit of time talking about how version control systems can track every change to a file. If you’re working on a team, it will even remember who made the revisions. That’s all well and good, but all of these previous versions are of little help if you don’t know how to access them. Luckily, there are several ways to get at the history of your work: you can directly access previous versions using the repo-browser, you can use TortoiseSVN to launch programs and make comparisons, and (if the program supports it) you can directly compare differences from within the program you are using to write the draft.
Using the Repo Browser
The first method to get at the history of your work (and the most robust) is to directly access the change history. Programs such as TortoiseSVN, KDESVN, and Versions make this easy through the use of a repository browser or “Repo-Browser.” Using the repo-browsers, you can look at any iteration of your file on the server, browse the history of your work, and look at what other people have done. You can download previous iterations in case you accidentally (or intentionally) deleted a section (and then regretted your decision).
To get an idea how the history appears, consider the screenshots below, which are taken from two separate programs: TortoiseSVN (a Windows client) and Versions (a Mac OS X Subversions Tool). Both programs give you access to the same information, though they do it through a slightly different way.
TortoiseSVN (Windows)
Image may be NSFW.
Clik here to view.
Repository Browser (repo-browser) from TortoiseSVN. The repo-browser provides access to all current and past versions of the files. You can access previous versions by clicking on the “Head” button in the upper right hand corner and then selecting which revision you would like to look at. Subversion keeps track of changes as numbered revisions.
When you use TortoiseSVN, it places the emphasis on the file hierarchy. The screenshot above shows the repository browser, which lets you access remote versions of your files. At first glance, it may not seem obvious about how you get to the previous versions of your files.
But If you look carefully, you’ll notice a small button in the upper right hand corner of the window (which you can find by right clicking on a folder you’ve placed under version control and selecting “TortoiseSVN > Repo-Browser), there is a button which says “HEAD.” When you click on this button, it will open a new window that you can then specify which “revision”you would like to investigate. This is how you navigate back through your work.
Image may be NSFW.
Clik here to view.
Subversion keeps track of changes as numbered revision. The current revision is called the “head.” The first revision in the project is number 1. In the project that you’ll see in these screenshots, I’m on revision 358.
By specifying the number of the revision that you would like to investigate, you can effectively travel back in time. You can inspect the files as they look at that point in the project’s history and download a copy. But unless you know the entire history of each change (or commit), though, merely choosing a revision number might not be the most straightforward way to navigate your work.
Image may be NSFW.
Clik here to view.
You can determine which version you might want to look at by using the SVN log. TortoiseSVN keeps this information in a slightly different location, which can be accessed by right clicking and then selecting “View Log” from the context menu. Here, you can browse messages and view a list of files that were changed when committing the revisions.
Luckily, though, Subversion keeps a log of all of the changes made. Each time that you make a commit, it will list all the files that were added, deleted, or modified. You will also be prompted to add a message regarding what was changed. (In general, it’s a very good idea to provide brief – albeit informative – summaries about what changes you made. This is not only useful for keeping track of the history, but can also be a powerful communication tool.) You can access the log by right clicking on the folder and then selecting “Log” from the TortoiseSVN entries in the context menu.
In the screenshot, you can see the log from a book that I’m currently writing. It shows the date of the commit, the message, and a list of the files that were modified, added or deleted. If you’re looking for a particular revision (perhaps when you decided to make a major editorial change), you can either browse the messages/file history, or search to locate the changes. If you want to look at how the files appeared at that point in time, you can launch the Repo-browser and automatically open it to the revision in question by right clicking and selecting “Browse Repository” from the context menu.
Image may be NSFW.
Clik here to view.
Once the repository is open you can do a number of very useful things, such as:
-
download an older copy of a file that you’d like to look at
-
locate an image that might have been accidentally deleted
-
visualize the changes that have been made to the file over time
-
Look at the specific changes made to any file in the project
these are all available from the context menu.
Image may be NSFW.
Clik here to view.
One of the many useful tools available tools from the repo-browser is the ability to visualize the history of a particular file. In the example above, the file was created at revision 94, renamed at revision 223, and split at revision 285 (where it was subsequently finalized). You can visualize any file’s history by right clicking from inside the repo-browser and clicking on “Revision Graph.”
Versions
Versions, in comparison to TortoiseSVN, emphasizes the history of the project. One of the two big navigation tabs you see when opening a working copy or repository allows you to browse the timeline and log. (Providing much of the same information seen in the TortoiseSVN log.) You see messages and the file history – what’s been modified, added, or deleted. If you want to look at the older version of the file, you click on the document’s name and Versions will download it for you.
Image may be NSFW.
Clik here to view.
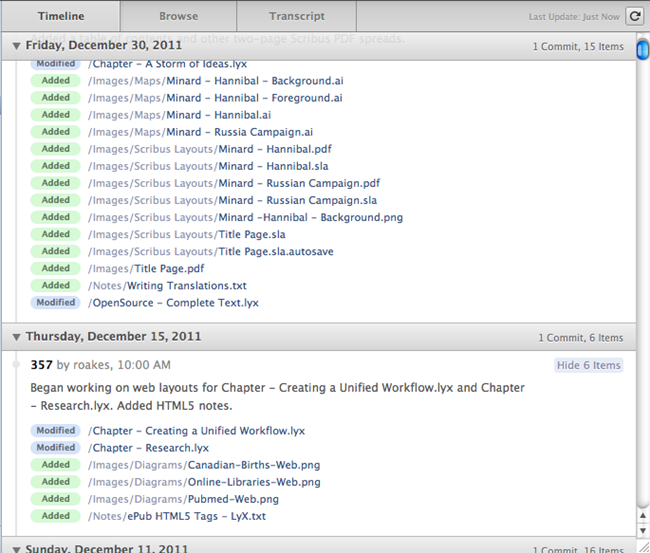
Versions provides two views to look at the history of your project. The first is a “Timeline” view, which shows all of your revisions and notes. You can view older versions of files by clicking on the link in the log. Versions will download a copy from your repository and then display it.
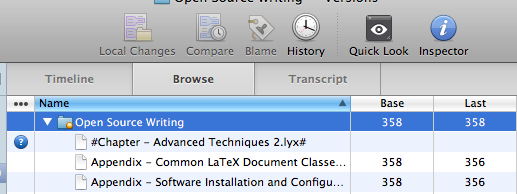
If you need more information than what is available in the Timeline, Versions also allows you to browse the entire log. You can access this information by going to the “Browse” link, selecting a file or folder, and then clicking on the “History” button.
Image may be NSFW.
Clik here to view.
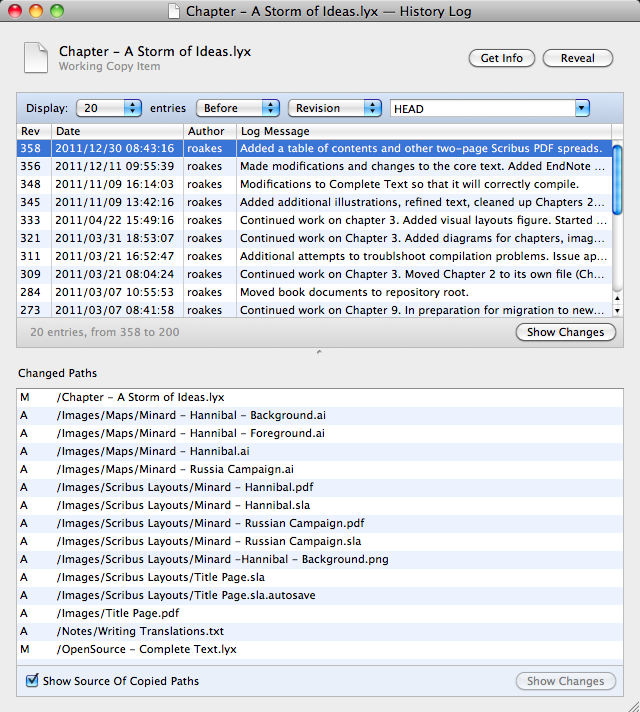
From the history pane, you can really drill down into what aspects of your work have changed. You can look at how file properties, for example, by clicking on the “Get Info” button. You can jump to the file location by clicking on the “Reveal” button. Or, you can analyze the line by line modifications by clicking on the “Show Changes” button.1 This will launch a “Difference Viewer” that will show you exactly what has been added, deleted, or modified since the older version.
Image may be NSFW.
Clik here to view.
If you need more information than what is available in the Timeline, Versions also provides you with a detailed history view. You can access the history by highlighting the file or folder you would like to access and clicking on the “History” button in the toolbar. The History dialog allows you to browse the log, in the same way that TortoiseSVN allows you to browse the log.
Image may be NSFW.
Clik here to view.
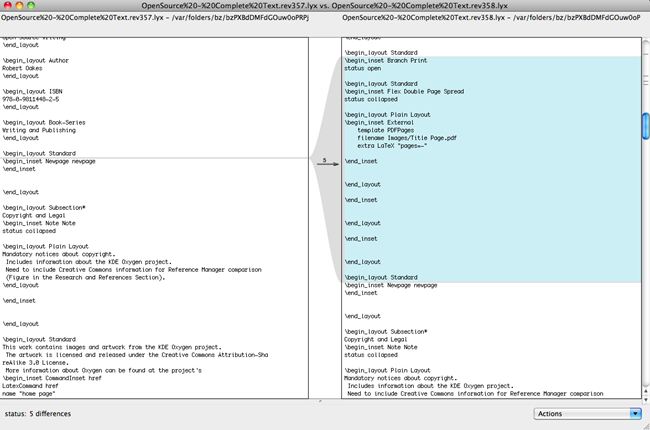
By clicking on the “Show Changes” button, it is possible to see exactly which portions of your work have changed. If you prefer an older version, you can either restore your work manually (by downloading the file and copying the modified portion), or revert to the older version automatically.2
As with TortoiseSVN, you can also browse the repository by clicking on the repository bookmark in the left hand navigation pane, including the entire revision history. This is useful if you need to find a file or folder that might have been accidentally deleted.
Other Ways to View Differences
While manually using the repository browser to locate old versions of files is the most robust way to explore the changes to your work, there are other methods to see a project’s history. In the previous section, we looked at two: the “Revision Graph” offered by TortoiseSVN and the “Show Changes” option offered by Versions. But while these tools are useful, they are also somewhat limited. The Revision Graph only shows you some of the changes to the file – such as when it was created, renamed, or moved – and the “Show Changes” feature of Versions only works with text-based files.
Luckily, though, there are other ways to compare older versions of your work against the current draft. In the remainder of this article, we’ll be looking at two of those:
- using TortoiseSVN to launch programs, such as Microsoft Word, which allows you to compare two drafts of a file side by side
- using programs, such as LyX, that have support for Subversion built-in
Using TortoiseSVN to Compare Two Revisions of a File
Where Versions on the Mac only allows you to look at the differences in text files, TortoiseSVN goes an additional step. It helps you to look at differences for many types of binary files such as Microsoft Word documents, PowerPoint presentations, Excel worksheets, or OpenOffice documents. To make the comparison, you click on the file that you want to look at and select “Diff with Previous Version” from the “TortoiseSVN” options in the context menu.
Image may be NSFW.
Clik here to view.
For Microsoft Office documents and other supported file types, TortoiseSVN will launch the program, download the older file, and load them side by side. (Unfortunately, this feature is not available in the tools on other platforms.) The screenshot below shows that this looks like for a Microsoft Word document.
Image may be NSFW.
Clik here to view.
In addition to allowing you to compare text based files, TortoiseSVN also makes it easy to look at some types of binary files such as Microsoft Word documents, PowerPoint files, and Excel spreadsheets. You can compare different versions by right clicking on the file and choosing the “Diff with previous version” option from the TortoiseSVN context menu.
In addition to the default binary files, you can add additional file formats through the use of scripts. If you regularly use a program (such as Adobe Acrobat) that supports document comparison, it is possible to write a script that can automate the process of downloading the previous version from the repository and load it alongside the current draft to make comparisons.
You can access the script settings by going to the “External Programs > Diff View” pane of the TortoiseSVN options. Then, click on the “Advanced” button. This will load the “Advanced diff settings” window (seen below). From the “Advanced diff settings” window, you can add new scripts, remove scripts, or edit the existing file formats.
Image may be NSFW.
Clik here to view.
TortoiseSVN allows you to specify which programs you would like to use to compare different types of files. If there is a program that you use frequently that supports comparisons, you can automate the process of downloading older versions and launching the program to compare them in a JavaScript or Visual Basic script. TortoiseSVN provides several examples.
Programs With Version Control Built-In
For all the power that repository browsers offer, though, the most convenient way to access a project’s history is from within a writing program. However, this is only possible if the program supports version control and subversion. LyX is one such program. It lets you pull up the history of a project, look at previous edits, commit your changes, and update your local working copy all without needing to ever leave the program.
When you want to look at a previous draft, you start the program and load the document you want to work on. Everything else happens from “Version Control,” underneath the “File” menu.
Image may be NSFW.
Clik here to view.
You can browse the history for the file, check in any changes you might have made, update the local working directory, revert changes that might have been made (which we’ll discuss more in depth in the next post), and compare with older revisions. In effect, you can use all of the features of version control that matter. Of these options, the one that I use most frequently is the “Compare With Older Revision…” and “Show History…”
Image may be NSFW.
Clik here to view.
Lyx provides built-in support for Version Control and Subversion. It allows you to browse the history of the file, look for specific changes, and compare with previous drafts. Above, it is possible to see the revision history for a book chapter that I have been working on.
The screenshot above shows the changes that I’ve made to a book chapter on publication design. This chapter has gone through several rather extensive revisions as I’ve tried to figure out the best way to present basic design principles to a novice audience. The message log captures some of these changes and how my thinking has evolved.
Because I haven’t been quite sure how to structure the writing, I’ve rewritten vast chunks of material. Some of the revisions have worked well, others have been less successful. For that reason, I frequently look at the older drafts next to the current draft.
To make comparisons, I select ‘Compare with Older Revision” from the “Version Control” options and then specify which revision I’d like to look at. (The “Version Control Log,” shown above, is invaluable when trying to figure out which revision.) I can either tell LyX how many “revisions back” I’d like to go, or specify a range.
Looking at a draft from one or two revisions back is useful if you happen to be working with multiple people. Perhaps you’re collaborating with a co-author and would like to see the editions she made to the document. Here, though, I want to compare my current work with one of my earlier drafts (revision 161).
Image may be NSFW.
Clik here to view.
Because the revision is quite old (and I know the specific number), instead of selecting “revisions back”, it’s easier to choose the“Between Revisions” option, and enter a range between 159 and 162. This encapsulates the revision I’m interested in and any other changes. I then tell LyX to pull up the old document and make the comparisons by clicking on the “OK”. It will look at the two drafts and open a third document with all of the differences highlighted which I can save to another location, or discard entirely.
Image may be NSFW.
Clik here to view.
When you compare with a previous revision, LyX will highlight all of the changes, so it is clear what has been added, modified, or deleted.
Summary
When working alone, version control is a powerful way to see how my writing has changed over time. It gives you peace of mind and provides you with a way to capture every edit. Using either the repository browser or a program which supports it natively, you can keep track of every file’s history. You can make comparisons or get at old copies. It’s a wonderful system, and the subversion history is what makes it all possible.
What’s even better, though, is when you start to leverage Subversion to work collaboratively. Co-authors or editors check out a copy of the files in the project. They edit them at their leisure and when finished with their revisions, they commit the changes to the repository. There’s no need for dozens of emails or attachments. Everyone starts and remains on the same page, and headaches are kept to a minimum. In the next post in this series, we’ll look at how to leverage subversion in groups.
__________________________
Notes
- While “Show Changes” is a tremendously powerful way to track how your work has changed, it only works with files that are text based. It isn’t possible to compare binary files like Microsoft Word documents, images, Adobe Illustrator illustrations, or Photoshop compositions. Additionally, if the file is text-based but composed of markup meant to be rendered by the computer, as is the case for SVG images or Adobe InDesign files, “Show Changes” will be of limited benefit. In such cases, it is usually better to download a copy of the old file and use a program’s built-in compare features directly.
- In most cases, it’s better to restore the work manually. Reverting to an older copy will delete new portions of the file that you’ve added.
Getting Started With Subversion – Part 2: Advanced Stuff is a post from: Apolitically Incorrect. Copyright 2009 – 2010, Rob Oakes.